Dear friend, thank
you very much for your support. First, let me declare the value of the goods.
Usually, the price you pay is 38~45$ (due to different postage). It contains
8xSG90 servos (US$2 X8 each) and a nodemcu 8266 board
(US$3.5), an expansion board (US$3) and 35 3D printed parts (consumable PLA
costs US$2.5, each set takes 3 hours ), power battery
(US$2.5), USB data cable, DC charging cable (US$2). Printed brochures and
packaging boxes (US$1). The shipping fee I set is generally that the buyer
bears 50% of the shipping fee, and I will also bear the average shipping fee
(US$5) for each order. If there is no refund, I will get a profit of
approximately [US$2-3] per set. The reason for the first statement is to let
everyone know that this is a very difficult job. The happiest thing is
everyone’s feedback. Many people are willing to give five-star support.
Several points of
special attention: 1. Before installation, use a DC cable to fully charge the
battery (because the steering gear angle needs to be reset during installation,
the battery needs to be charged). 2. Each time you install the steering gear arm,
you need to turn on the switch once and turn on the switch to return to the
steering gear. 3. Be careful not to install mirror images on the parts. let’s
start!
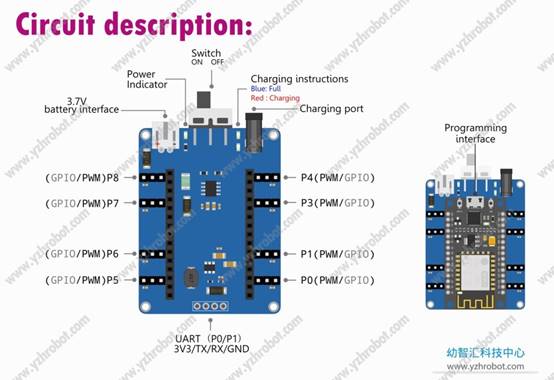
Step 1:
Check the parts
and charge the battery.The
next step of installation can only be performed when the battery is charged,
because the servo needs to be reset during the installation process. When the
connection is correct, turn on the switch, and the servo will automatically
reset.
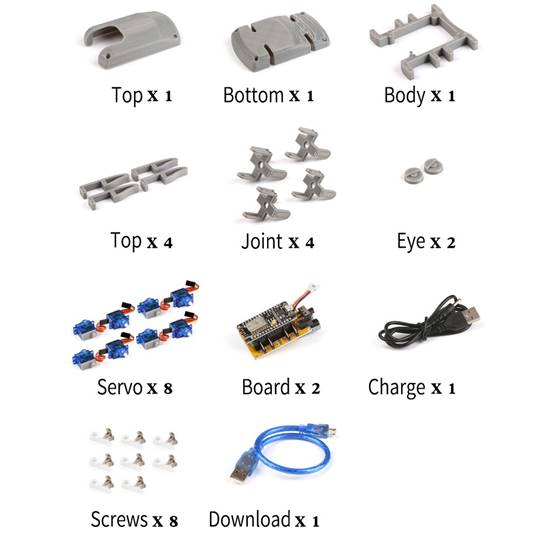
Step 2:
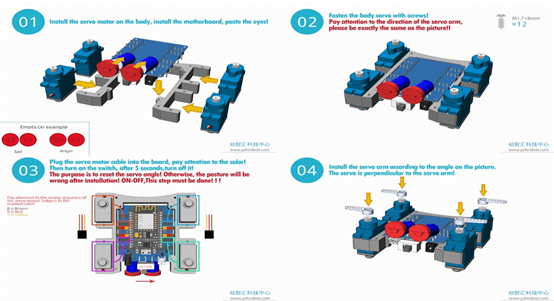
The simplest, we
first tear off the double-sided tape from the eyes and stick it on the
capacitor. The angle determines the facial expression. It depends on you.Next, we install the four
servos in the four grooves of the body. Note that the shaft side of each servo
is biased to the outside relative to itself.The
wire connecting the body servo, brown is negative, red is positive, and yellow
is IO signal. Can not be inserted wrong. Pay attention to the color code on the
check manual.Before
installing the steering gear arm, you must turn on the switch once, and you
will hear the sound of the four steering gears turning, which indicates that it
has returned to its original position after turning. At this time, turn off the
switch, and then install the servo arms in such a way that the four servos are
perpendicular to the body at 90°.The teeth of the steering gear arm may
have production errors, you only need to ensure that it is as vertical as
possible. If the error is large, you can change the position of the steering
gear arm to correct it.
Step 3:
The line
connecting the four claw servos, brown is negative, red is positive, and yellow
is IO signal. Can not be inserted wrong. Pay attention to the color code on the
check manual. Before installing the steering gear arm, you must turn on
the switch once, and you will hear the sound of the four steering gears
turning, which indicates that it has returned to its original position after
turning. At this time, turn off the switch, and keep the four steering gear
arms parallel to the steering gear body.The teeth of the steering
gear arm may have production errors, you only need to ensure that they are as
parallel as possible. If the error is large, you can change the position of the
steering gear arm to correct it.Install
the steering gear to the four claws, pay attention to the direction of the arc
consistent with the instructions, otherwise your spider may have four feet up
to the sky. . . . .
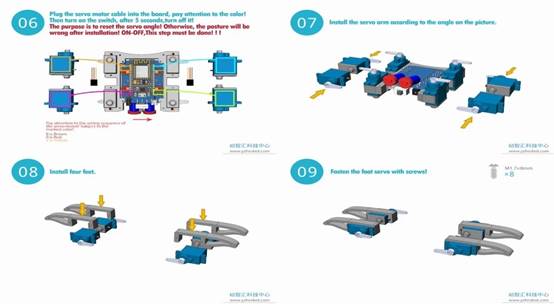
Step 4:
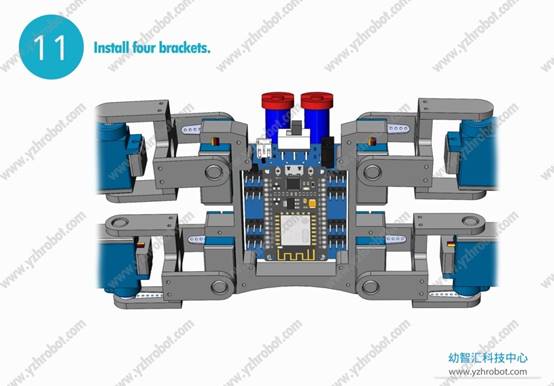
For the
installation of the four brackets, you can loosen the screws to install, of
course, this is quite complicated. You caFind the
position of the bracket, don’t engage in mirroring. For the installation of the
four brackets, you can loosen the screws to install, of course, this is quite
complicated. You can also just gently break the card and go in. Although it is
fast, there is a risk of breaking. This is up to you.
Step 5:
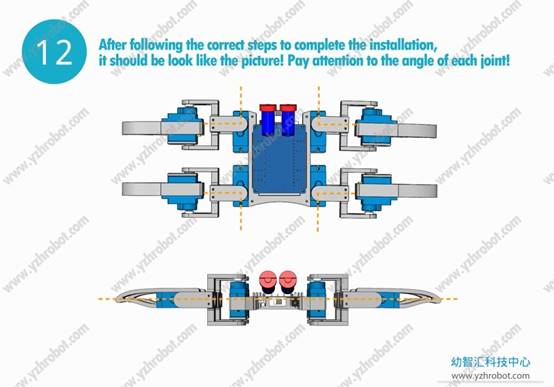
If you strictly
follow the precautions of the previous installation steps, you will get a
spider without a cover, and the work has been completed 80%. At this
time, when you turn on the switch, your spider will keep the look below after
shaking its body, proving that you have installed it correctly.If
you turn on the switch, it is not in this posture and the posture is strange,
then it proves that you did not reset the steering gear angle correctly when
installing the steering gear arm, or the steering gear arm angle was installed
incorrectly, or the servo wire was inserted into the incorrect position.
Step 6:
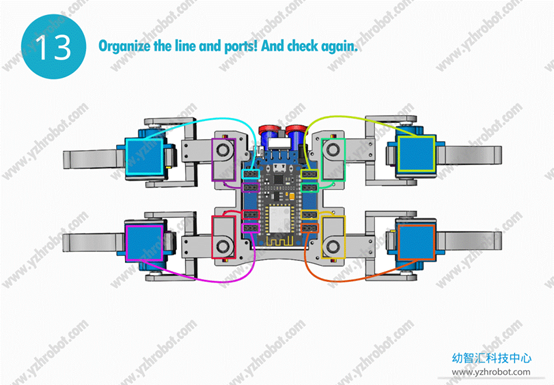
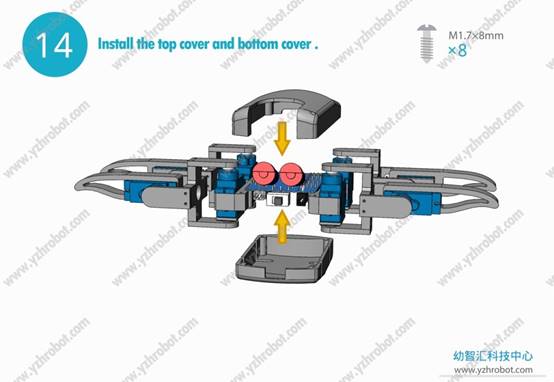
Comb the wiring
harness, let the wiring harness move freely in the gap of the bottom cover,
tighten the bottom cover, tighten the top cover! The work is done!
Step 7:
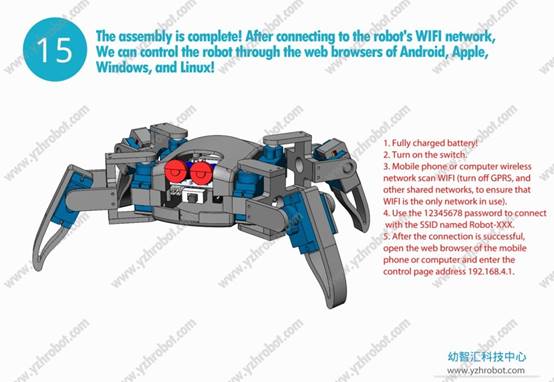
Connect the robot
and remotely control it! First, turn on the switch of the robot, turn on the
WIFI of the mobile phone, retrieve the WIFI named ROBOT, and the password is
12345678. After connecting to the WIFI, turn off the GPRS to ensure that the
WIFI is the only connection. If the mobile phone prompts that the network is
unavailable, whether to continue, select Yes. Then open the browser and enter
192.168.4.1 in the address bar to confirm. The page opened at this time is the
control page. We can control it with a mobile phone, a computer, or other
equipment. Many friends keep asking me for APP after purchasing. After reading
this, I believe everyone understands that it is controlled through a web page
and does not require any APP. Good luck!
- Robot Assembly: https://drive.google.com/file/d/1H8VnYowE-yR0YHpdDrjSRG-L_OqinDvZ/view?usp=sharing
- Robot Souse code: https://drive.google.com/file/d/1mJpzkrFjT5Ykf3K9TATh7FCRjT-tHTvJ/view?usp=sharing
- Robot Souse code Hi speed without led (V1.0 board
without led factory default program)https://drive.google.com/file/d/1wgJF0tE8qB57Qblvy6lUvdtnBuktMMi-/view?usp=sharing
- Spider robot: https://drive.google.com/file/d/1RUR8PPGyxwwySmHFg7AEg8Us52umAKPN/view?usp=sharing
- NOTE: If you purchased version 2.0 and the eyes are
LEDs, then download the latest code and schematic below and the
information above. In addition, the 2.0 version omits a separate charging
cable and combines it with the data cable. When charging, the switch needs
to be turned off.
- Souse code V2.0: https://drive.google.com/file/d/1rm_43HZVcIB1BjmPO8DloVymBM9K2gza/view?usp=sharing
- SCH V2.0: https://drive.google.com/file/d/12euE4HX-JxXfj6-QNwSl7xX1uT0yXiKu/view?usp=sharing